Thursday, January 31, 2013

Nokia asha 300 localmode solution ways diagram

NOkia Asha 300 Local mode Solution

If Nokia asha 300 shown only local mode on the display and phone becomes hang, this is called Nokia asha 300 localmode problem. This is a problem which make your phone 100% unusable. This is tested localmode solution ways diagram for Nokia asha 300.To solve Nokia asha 300 local mode just remove the red marked component and your problem will 100% solved.
Nokia Asha 300 on-of ways jumper
Nokia Asha 300 on-off ways jumper solution
If Nokia asha 300 on-off problem that means phone face power switch problem, follow the picture carefully. The picture contains Nokia asha 300 power on/off problem solution. Check all line which shown in the picture and make jumper as shown in the picture. This is tested Nokia Asha 300 on-off ways jumper solution diagram.

Nokia asha 300 insert sim repairing solution diagram

Nokia asha 300 insert sim repairing solution image

The picture contains Nokia asha 300 insert sim card repairing solution diagram. Check,  replace these red marked components as shown in the picture.

NOkia Lumia 800 All Solution


NOkia Lumia 800 All Solution Free
Nokia lumia800 Hard Reset
Nokia lumia 800 Camera Solution
Nokia Lumia 800 Sensor0 Solution
Display And Touch Solution
NOkia Lumia800 Sim Solution
Nokia lumia 800 Camera LED Solution
Nokai Lumia 800 Bluetooth Solution


Quote:
download here

nokia 100,nokia 101 display solution 100%tested

nokia 100 mic solution


nokia 100 test mode solution


Nokia 100 sim solution


Nokia 100 MMC Solution


Nokia 100 insert sim solution


Nokia 100 charging solution

Nokia 100 Buzzer Solution

Wednesday, January 30, 2013

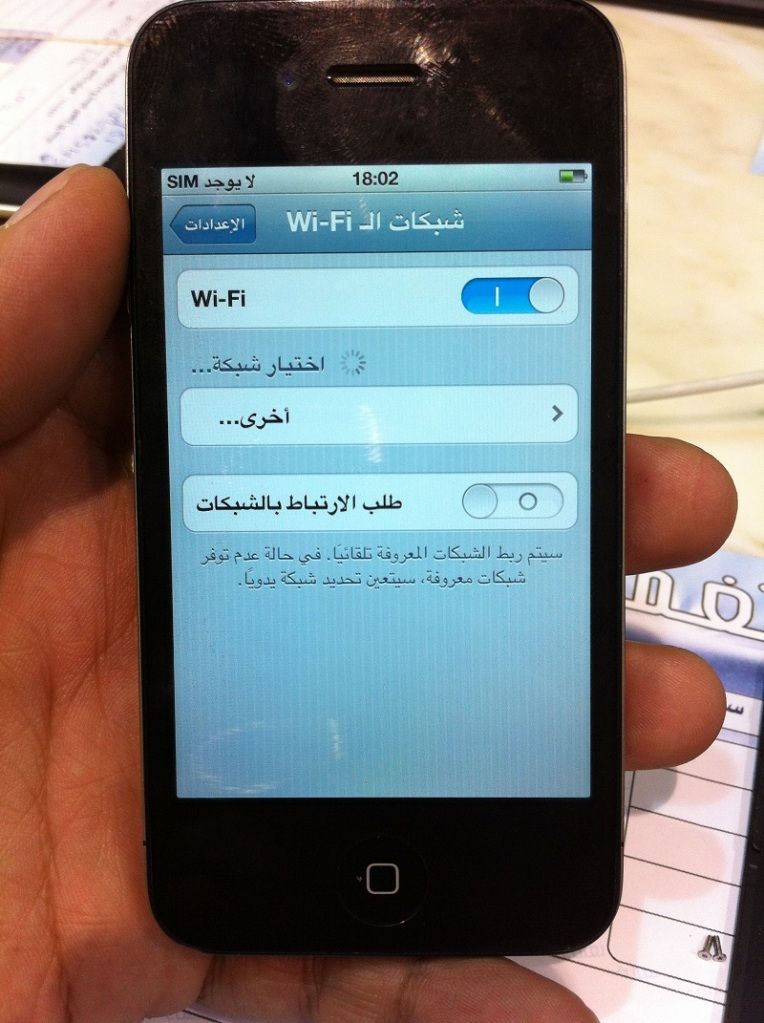
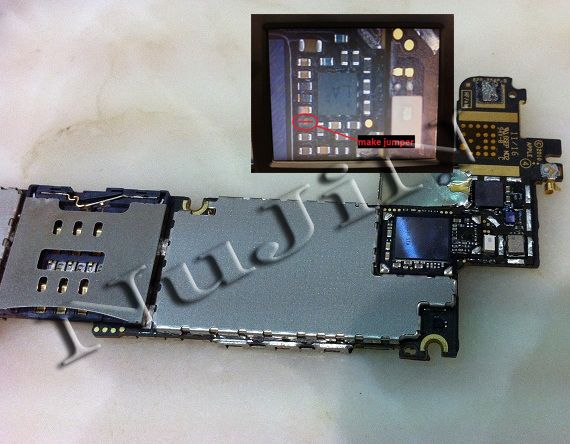
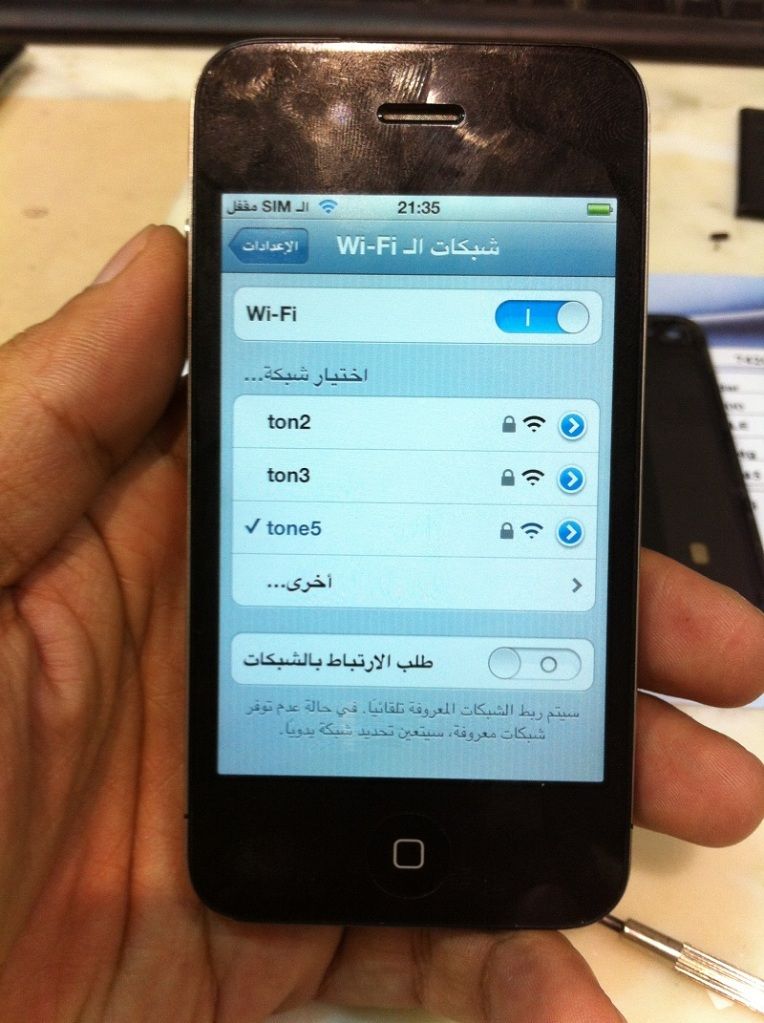
iPhone 4G wifi searching only done by jumper

model : iPhone 4G
history : wet
problem : wifi searchinh only can't detect
action taken : 1 shot jumper

SCREENSHOT


APLLY THIS SOLUTION


STATUS AFTER


iPod 4G home jumper solution

model : ipod 4ghistory : bigla lang dawproblem : home not workingaction taken : simple jumper
SCREENSHOT


TAKE NOTE:

Tuesday, January 29, 2013

BSNL Penta TPad IS701 R HARD RESET

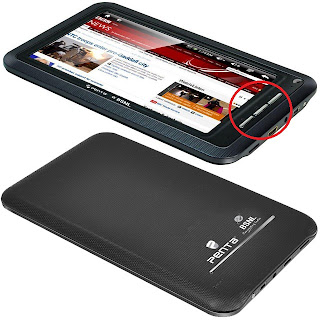
How to Reset Penta TPad IS701 R

Actually I was having Penta TPad IS701R and It was restarting. So I tried to contact *******r care of Pental Technologies but as always it was busy then i thought that i should reset my Penta TPad but when i used the back button for reset system got off but it was not resetting.

I tried to find out solution over search engines but i didn't find any relevant page that relates to resetting the Penta Tpad but one day i solved the issue by resetting the Tpad.

So I am going to tell you that how can you reset your Penta TPad IS701R.


1. There three buttons at front in Penta TPad as below
2. Press these three buttons together and then try to start Tpad by using Power Button. Once you done it It will ask you to press the button Press the top most button (Which is going to be used for back). and then it will show that your Penta TPad is resetting.

Use these steps and your Penta TPad will be reset and hope that all the problem will be automatically fixed

Samsung E1282T Unlocking with Flashing..Done.

Samsung E1282T Unlocking with Flashing...


Download Link
Code:
1. Choose one(Bautrate: 921600)
NOR_FDL : nor_fdl.bin
NV : nvitem.bin
PS: SC6530_sc6530_samsung_EricPlus_stone.bin
MMICSC: mmi_res_128x160_csc.bin
2. In Calibration part, click "uncheck" and push OK button.
3. first press start buttonand and press ok key among navi-key after inserting battery
and Usb cable connection
4. Confirm the downloaded version name and etc. :
*#1234#
Full Reset :
*2767*3855#

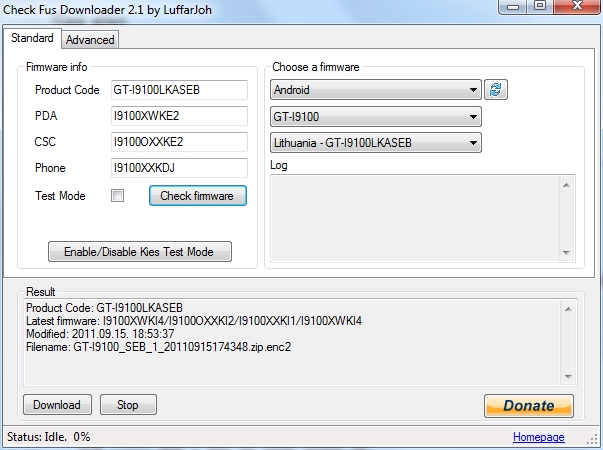
Samsung Check Fus Downloader v 2.1.0.0

Samsung Check Fus Downloader v 2.1.0.0


Version History


  • Samsung Check Fus Downloader v 2.1 (File version 2.1.0.0)
    • Added ability to download TestMode firmwares
    • Let's you enable TestMode in Kies (Please report on XDA if it works)
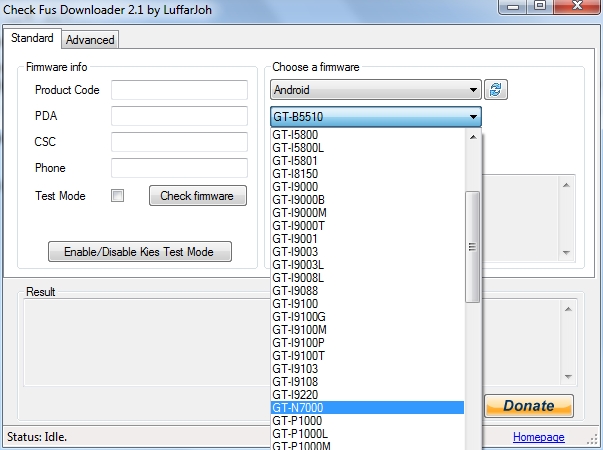
    • Sorted model list


  • Samsung Check Fus Downloader v 2.0 (File version 2.0.0.1)
    • Fixed high memory consumption when downloading files.
    • Should work in Win XP now
    • Bada support
    • Not limited to the preset list anymore (Advanced tab)
    • Decrypt a already downloaded firmware
    • CRC check a already downloaded firmware
    • Bug fixes and a lot of code clean up.
    • Icon
    • FusCipherUtil.dll no longer needed for running Check Fus Downloader
Download links


Official support site The webversion of Check Fus 2.0Also known as

  • Samsung Check Fus Downloader / Samsung Check Fuse Downloader
  • SamsungCheckFus / SamsungCheckFusDownloader / hidswver PDA CSC PHONE
News

(click to toggle older news)
2011-09-27
As many of you probably have noticed, @SamKiesUpdates have begun tweeting firmwares found using TestMode in Kies. I will add ability to download TestMode, enable TestMode in Kies and the next version will also have a sorted list.

But what is TestMode?
TestMode is a mode in Kies which enables you to install a not yet (but soon to be) released firmware and is only intended to be used by advanced users! Not for the regular user.
As promised, here is the new version: Check Fus Downloader 2.1.

v.2.1 - File version 2.1.0.0
* Added ability to download TestMode firmwares
* Let's you enable TestMode in Kies (Please report on XDA if it works)
* Sorted model list


Official support site Check

The webversion of Check Fus 2.0


 Screenshots


[Check Fus Downloader] V2.1 More Info Inside The Thread !


Easy Method to download the latest update of samsung firmware just with one click ,

Check Fus Downloader 2.1

More info visit : The webversion of Check Fus 2.0
 

Factory firmware download sites for [Tablet] A10 firmware

[Tablet] With AllWinner A10 Rom Dumper

AllWinner A10 Rom Dumper

Download:

A13_ROM_Dump_Tool.7z

Instructions:


This tool dumps the firmware of your A1x device onto your PC using ADB.

If you are not familiar with ADB seek the web for more info.
This dump requires to have an SD card mounted in the device with at least 512MB free space available.
Note that this dump is not a ROM that you can flash, however with the ROM kitchen it's possible to rebuilt a flashable ROM
using the files from the dump.

What does it do:


Uses ADB (included in the package) to dump the entire content of the A13 that has been connected

Makes a dump on the device's SD card and then pulls it to your local computer

ALL MTK SPD COOLSAND MSTAR PINOUTS HeRe

ALL MTK SPD MSTAR AND COOLSAND PINOUT POST HERE WITH PIC

BOOM X2-02 COOLSAND PINOUT


2ND BOOM X2-02 COOLSAND PINOUT


Tasen TA8 Pinout

Monday, January 28, 2013

Auto Reset LCD BlackBerry

 
All Working Link Here:

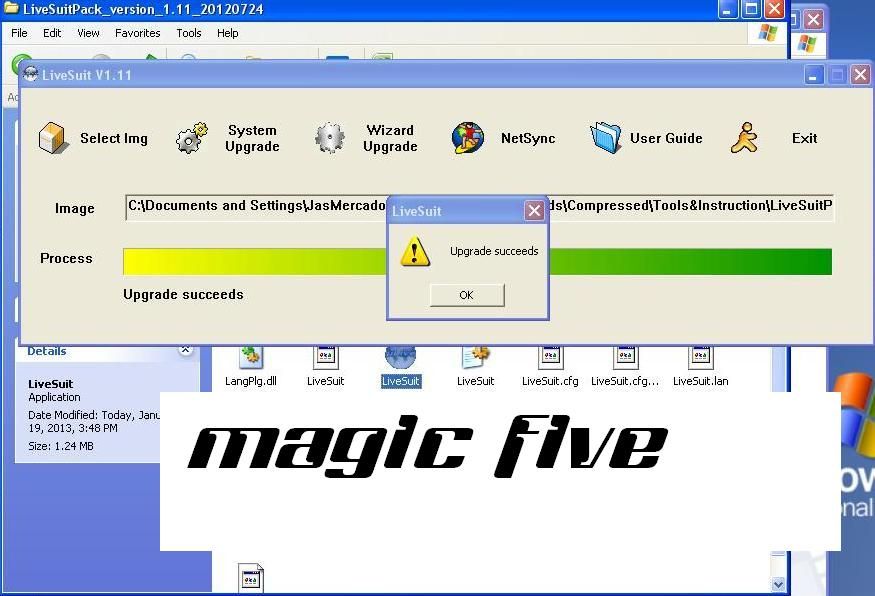
XTOUCH X714 too many patterns attemp done by LiveSuit

XTOUCH X714 too many patterns attemp done by LiveSuit

procedure's

==> Before the restoring, make sure your device is turned OFF, and with at least 1/4 electricity in the battery.

==> You’d better upgrade the device under Window XP System.

==> During upgrading, install the driver automatically when system requires.

==> All the data will be erased after the restoring. please backup before restoring.

==> Wrong version of firmware will cause malfunction in the device.

==> Double click “LiveSuit.exe” to run the software

==> Click “Select IMG”, and select IMG file of the right version of the right model

==> Power off the device, press & hold volume button on the device, connect the device to computer via USB cable. (if you release the volume down button, the device shows charging display; then you have to disconnect the device, and try again: hold the volume down button then connect with computer )

==> Don’t release finger from the volume button, press power button for 10-15 times till yes/no windows pop up.

==> Click “yes”

==> When the process bar is activated, you can release your fingers, and the restoring will finish itself.

==> You may need to install driver of the LiveSuit software

==> wait until "UPGRADE SUCCEEDS"


screen shot


XTOUCH Software Download HERE

Download_Xtouch | touch the world

MyPhone T23 TV DUO Headset "Problem" [ Solved ]

MyPhone T23 TV DUO Headset "Problem" [ Solved ]

ModeL:
MyPhone T23 TV DUO


Problem:
Headset Problem/Automatic apear headset on screen

Solution:
Jumper / follow the red mark!


Done Tested Solution!

Loader Rapido BlackBerry 9220-9320-9810

Saturday, January 26, 2013

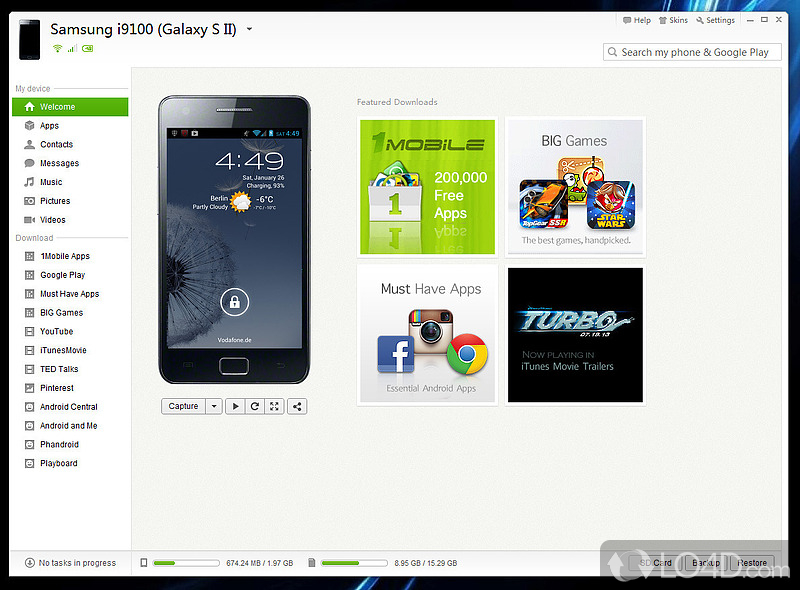
Android Pc Suite 10000000000000000% Best

All in One
Android Pc Suite

Direct Install Apps To Your
Andriod Phone Or Tab

Direct Download And Install Apps,games,Widgets,Live Wallpapers,
And more Many Thing From Andriod 1 market
Supported Model
All Tablet Pc
All Android
Mobile Phones

Auto Driver
Download suitable
ForYourAndriod


easily install or remove apps
easilly move apps
To
phone memory
or
Memory Card


Download Android Pc Suite

Upgrade Samsung Galaxy S i9000 Firmware using Odin Flash Tool

Upgrade Samsung Galaxy S i9000 Firmware using Odin Flash Too


flash Samsung Galaxy S i9000 with either leaked, custom ROM or Official release.

Requirements

  • Unlocked Samsung Galaxy S i9000
  • Latest Samsung Kies or Device drivers installed.
  • ODIN 3 version 1.0 (flash program)
  • Upgrade Firmware upgrade File (.tar) can be downloaded from Samsung-Firmware
  • .PIT file (the boot file of the phone generally called 512.pit) which will be included in upgrade file.
  • USB cable
Procedure

  • Open Odin (preferably “Run as Administrator”)
  • Browse the PIT file from extracted firmware upgrade.
  • In PDA, browse the TAR file which is the main file requirement.
  • Optionally if there is any file with CSC in it, browse and select it.
  • Switch off Phone and remove SD Card (if any) and SIM.
  • Connect with USB
  • Hold Volume down + Home Key + Power button till the phone boots in “Download mode”.
  • Press Start button on Odin program window after it detects ID:COM
  • Phone will reboot again and whoa! your Phone is flashed with latest firmware.

Disclaimer
  • Take Backup of Contacts, Messages and Calender events and Apps before proceeding as it will erase all data in ROM.
  • I have flashed my Samsung Galaxy S i9000 with official leaked ROM using the following procedure and it worked fine on Windows 7.
  • We are not responsible if you accidentally brick your phone.
Let any firmware release or leak on web, if it is not available officially for you, flashing with odin is a working method. After Flashing, the phone is unrooted so, you will have to root Samsung Galaxy S i900 again in one click available for 2.1 Eclair and 2.2 Froyo.


Flashing the device firmware can fix unexpected errors or failures on the device or when all else fails, it is the only way to restore a device to working condition after a partial brick or boot loop.


Preparing and Setting up ODIN and Files used to Flash.
-Odin3 version 1.85
or here
Then download the latest Samsung Galaxy S II Original Firwares


Or find and Download the latest firmware Updates

Flashing the Samsung Galaxy S II I9100 Procedures:

1. Extract and Run the ODIN flasher tool.


2. Check these checkboxes options: Re-Partition , Auto Reboot , F.Reset Time


3. Select the PDA/Modem/CSC/.PIT files in Odin
In the PIT section, select the u1_02_20110310_emmc_EXT4.pit file you downloaded.
In the PDA section, select the CODE_I9100xxxxx_CL161513_REV02_user_low_ship.tar.m d5 file.
In the PHONE section, select the MODEM_I9100xxxxx_REV_02_CL995882.tar.md5 file.
In the CSC section, select the GT-I9100-MULTI-CSC-Oxxxxx.tar.md5 file.


4. Prepare the Samsung Galaxy S II into DOWNLOAD MODE.
Turn the phone into the download mode by pressing and holding
VolumeDown+OK+Power at the same time.


5. Connect the Device to PC using the DATA cable
Connect your phone with your computer and wait until the drivers are installed.
Make sure the ID:COM box highlighted yellow to know that the handset is connected to the PC properly.
If you still do not get any results, try another USB port on your computer.


6. When all binary files needed is ready, Enter the Device into Firmware Downloading process, Click Start.

The phone will be flashed and once it’s finished, it will boot up.Do NOT disconnect the usb-cable, remove the battery or otherwise interrupt this process!
But if you do not see a blue progress bar on your phone after 5 minute, take out your phones battery, unplug your phone and start from step 1 again.
7. Handset reboots when flash or download completes
Once you see the message "PASS!", you have successfully flashed your phone.


8. Codes to confirm the Downloaded Firmware Version
*#1234#
Full Reset
*2767*3855#